Linking Control To Report
The data-analysis companion to ChromGraph CONTROL is called ChromGraph REPORT. Detailed instructions
The data-analysis companion to ChromGraph CONTROL is called ChromGraph REPORT. Detailed instructions for using REPORT are provided here. It is imperative that you learn Report thoroughly before you attempt to link the two programs.
Linking Control and Report allows data analysis and printing to occur immediately after each sample is run. This saves a little time if you have a large numbers of samples and a slow printer. For most situations, however, we recommend the unlinked Batch-Process mode.
REPORT IN THE BATCH-PROCESS MODE
The easiest way to interface the two modules is not to interface them at all. Many users prefer to separate data collection and data analysis into two separate activities. This reduces the array of things one must do before starting a series of runs, and reduces the chance of making mistakes.
In the batch-process mode you first do the chromatography. For example, you may have 30 microdialysis samples in which you are determining amino acids. Create an appropriate Method within CONTROL, paying particular attention to the default data location to which the data will be saved. Configure the autosampler appropriately, start the system, and let the chromatograph and autosampler process the samples overnight.
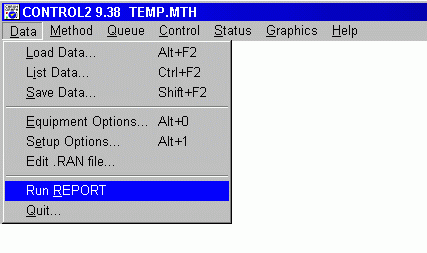
In the morning you will have a set of 30 data files in the default data location, plus a log file detailing the runs that were made and recording any error messages. (The log file has your Method's name followed by a ".log" extension, and can be found in the startup directory, usually C:\BAS2 or C:\BAS3). Now load REPORT. This can be done by double-clicking on the REPORT icon in the Start Menu or Desktop, or by taking the RUN REPORT option from Control:

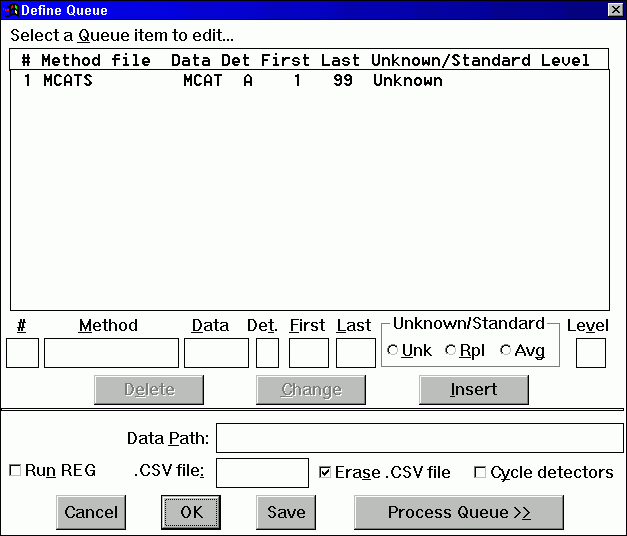
When REPORT is active, load a data file for any one of the runs of interest. This will both set the appropriate default data location, and allow you to process a sample run and tailor the report to your needs. Next use REPORT's QUEUE dialog box to instruct the software on the Method(s) to use and the runs to process:

Press the PROCESS QUEUE button, and all the runs will be analyzed.
REPORT IN THE LINKED MODE
REPORT can be configured to process the data from each run immediately after the run is completed. This is a more complex procedure than the batch-process mode. The advantage to the linked mode is that printed output from early runs can be examined while later runs are still in process. And if you do the runs overnight, the printed reports will be waiting for you the next morning.
We recommend that you attempt the linked mode only after you are thoroughly familiar with both Control and Report.
The first step in setting up the system for linked data processing is to erase, rename or move any data files with the same name and run numbers as those you will be creating with the new runs.
We recommend that old data files be archived on a floppy disk with the Method and LOG files associated with them. Use Window's Explorer or My Computer to copy these files for storage.
To ready REPORT to receive data, first load some data from the directory in which Control will save it. This sets the default data location appropriately. Next, set up a Report QUEUE listing the Method and run numbers to use:

If more than one detector is configured, you need a line for each one. Also check the CYCLE DETECTORS box, which tells Report to process all the detectors for any run before going on to the next run. Then click the PROCESS QUEUE button. Since the data files to be processed do not yet exist, the message "REPORT Queue Awaits:" will appear:

Report will do nothing until Control writes the data files to disk.
Now switch back to Control. Start the sequence of runs or the Queue. After the data for each run are saved, Report will become active and produce a report for the run.
- href="/manuals/LC_epsilon"ref="index">CONTENTS
for using REPORT are provided here. It is imperative that you learn Report thoroughly before you attempt to link the two programs.
Linking Control and Report allows data analysis and printing to occur immediately after each sample is run. This saves a little time if you have a large numbers of samples and a slow printer. For most situations, however, we recommend the unlinked Batch-Process mode.
REPORT IN THE BATCH-PROCESS MODE
The easiest way to interface the two modules is not to interface them at all. Many users prefer to separate data collection and data analysis into two separate activities. This reduces the array of things one must do before starting a series of runs, and reduces the chance of making mistakes.
In the batch-process mode you first do the chromatography. For example, you may have 30 microdialysis samples in which you are determining amino acids. Create an appropriate Method within CONTROL, paying particular attention to the default data location to which the data will be saved. Configure the autosampler appropriately, start the system, and let the chromatograph and autosampler process the samples overnight.
In the morning you will have a set of 30 data files in the default data location, plus a log file detailing the runs that were made and recording any error messages. (The log file has your Method's name followed by a ".log" extension, and can be found in the startup directory, usually C:\BAS2 or C:\BAS3). Now load REPORT. This can be done by double-clicking on the REPORT icon in the Start Menu or Desktop, or by taking the RUN REPORT option from Control:

When REPORT is active, load a data file for any one of the runs of interest. This will both set the appropriate default data location, and allow you to process a sample run and tailor the report to your needs. Next use REPORT's QUEUE dialog box to instruct the software on the Method(s) to use and the runs to process:

Press the PROCESS QUEUE button, and all the runs will be analyzed.
REPORT IN THE LINKED MODE
REPORT can be configured to process the data from each run immediately after the run is completed. This is a more complex procedure than the batch-process mode. The advantage to the linked mode is that printed output from early runs can be examined while later runs are still in process. And if you do the runs overnight, the printed reports will be waiting for you the next morning.
We recommend that you attempt the linked mode only after you are thoroughly familiar with both Control and Report.
The first step in setting up the system for linked data processing is to erase, rename or move any data files with the same name and run numbers as those you will be creating with the new runs.
We recommend that old data files be archived on a floppy disk with the Method and LOG files associated with them. Use Window's Explorer or My Computer to copy these files for storage.
To ready REPORT to receive data, first load some data from the directory in which Control will save it. This sets the default data location appropriately. Next, set up a Report QUEUE listing the Method and run numbers to use:

If more than one detector is configured, you need a line for each one. Also check the CYCLE DETECTORS box, which tells Report to process all the detectors for any run before going on to the next run. Then click the PROCESS QUEUE button. Since the data files to be processed do not yet exist, the message "REPORT Queue Awaits:" will appear:

Report will do nothing until Control writes the data files to disk.
Now switch back to Control. Start the sequence of runs or the Queue. After the data for each run are saved, Report will become active and produce a report for the run.
